In this article
When the DD has finished a processing job, it moves the job header XML file, with all the information about the job, to the Archive folder, located under the Data Folder path.
This data can be converted into Monitor Data Jobs named DDArchiveJob and DDStatusWorkJob that can be sent to LS Central database or standard SQL database for reporting purposes (or to be used with the Web Monitor program that runs off these database tables).
Monitoring tables are (in LS Central 17.5 and later these tables have an LSC prefix):
- DDMonitorHdr
- DDMonitorLine (LSC DDMonitorLine2 in LS Central 24 and later)
- DDMonitorLocStatus
- DDScheduler
- DDSchLog
The Monitor Data Job inserts the data to DDMonitorHdr and DDMonitorLine tables.
- DDMonitorHdr includes the basic information about the job such as Pack/Job Id, Job status, and create time.
- DDMonitorLine contains information from the source and destination hosts, such as host status, server messages, connection string, and last registration time. The index ID for the host is -1 for the source host (where the data was pulled from) and 0 and up for destination hosts (where data will be inserted).
The Monitoring Collection setup is needed where DD is running to collect job status data.
- In the DD Configuration Tool, click the Monitor Config tab, and select the Activate check box:
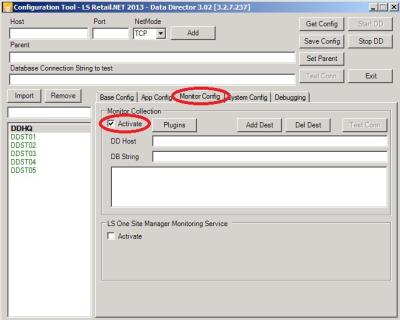
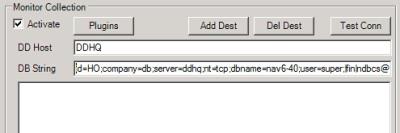
- Type in the DD Host of the DD Service you want to send the monitor data to, and the database connection string of the central database in the DB String field where the monitor tables are located. You can copy the connection string from the Distribution Location card in LS Central. The connection string has to have the usual "Version" ending, like this:
- SQL Database: |ms|none
- LS Nav: |ms|navXXX
- LS Central: |ms|bc
- LS Central Version 24 and later: |ms|bc24
- If the Monitor data job needs to be routed via another DD Host, type the routing path in the DD Host.
Example: If POS is running DD and jobs need to be routed via Store Server, then type STORE;HQSRV into the DD Host field and the Job will be routed from POS via the Store server to Head Quarters.
- Click the Plugins button to select which plugin to use:
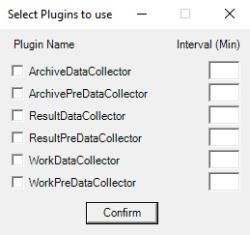
DD has three types of plugins:
- Archive Data Collector takes the data from the Archive folder. These are all processed jobs with the status Done.
- Work Data Collector gets the job data from the DD Router's memory. These are all jobs still in processing, waiting for processing or jobs with error.
- Result Data Collector takes result data from Manual Replication and updates the Monitor data with the results.
- Select the plugin you want to run, and type in the Interval how often you want to send data for the plugin. Other plugins can be created that would collect some other information like OS status or Database Server data.
Note: There a few different versions of each plugin.
xxxPreDataCollector with Pre in the name come with Data Director 3.2.112 and later. These plugins are to be used with LS Central version 17.5 and later where table names have LSC prefix added. For LS Central version 24 or later, set the Database connection string with parameter bc24 as DDMonitorLine table has been renamed to DDMonitorLine2.
xxxWSDataCollector with WS in the name come with Data Director 3.2.142 and later. These plugins are to be used with Cloud storage locations (with AZURE mode) and monitoring data will be transfered via DD Web Service. These plugins use table names with LSC prefix.
- Click the Add Dest button to add this destination to the list. You can add as many destination databases as you want, and the Monitor data will be saved into each database you define here.
- To remove a destination, click the destination in the list, and the click the Del Dest button.
You can also test the connection by clicking the Test Conn button. To be able to test the connection, the data for the destination needs to be in the edit fields. If you are testing a destination that is already in the list, double-click it and the data will be loaded into the edit fields.
Note: When done, remember to click the Save Config button to save the changes locally, or the Send Config button to send the configuration to Remote or running DD Host.
Monitoring large environments
It is possible to separate the data coming from Stores vs data coming from Head Office servers. Use the DD Class ID found in the Base Config tab in the Configuration tool. This will register Class value in the DDMonitorLine table. For this to work, make sure that the Class column is part of primary key in the DDMonitorLine table. LS Central version 24 had new table DDMonitorLine2 which has the Class field as part of primary key.
If the setup is large, a lot of Stores and POSs and few DDs running at HO, it can be useful to set up two sets of Monitor Data Collection tables. This can be done by creating two different companies in the Database where Monitor Data should be inserted, and by sending HO DD Data to one company and Store DD Data to another.
By doing this, it is possible to match the data coming from Stores against data coming from HO as there could be a case where a Status Message was lost, and HO DD is waiting for update, while Store DD say the job is done, so the data coming in from both locations will not override each other as they would if both DDs would send to the same set of Tables.
With both cases, where you use DD Class ID or use two sets of tables / companies, Web Monitor does not support this, but the data can be used in external monitoring tools or by creating reports customized to client needs.
Note: DD version 3.2.20 and later sets different status on jobs that are missing status update, instead of Unknown the job will get status NoStatus, which means that DD was not able to update the status for that destination, and to be able to get the final status you need to look at the Job Monitor at the destination DD. Having two sets of Tables for the Monitor Collection Data would help checking cases like this, where you find NoStatus in HO job data, and can look it up in Store job data to see the latest status.
Application Insight
It is possible to send monitor data to Application Insight:
- Download the extra plugin from the LS Retail Portal, the Data Director Downloads section (login required), and extract the files into the plugins folder under bin folder where Data Director is installed.
- In the Monitor Collection tab, select the Application Insight plugin from the plugin list, specify the DD Host that should process the data, and send to Insight and the connection string to access Insight.
The connection string is in this format:
InstrumentationKey=<GuidKey>;IngestionEndpoint=<url>;LiveEndpoint=<url>